Author's Note: Since writing this article, I've refactored my approach to dark mode on my own site. Check back in 2023 for an updated article detailing how to implement dark mode through use of CSS custom properties.
Whether you like dark mode or not, your site visitors may already be choosing to use it. The default results might not be ideal for your brand and might even be illegible. From a practical perspective, ensuring that dark mode looks and works well for our site's content is of mutual advantage to us and our site's visitors. Perhaps even more importantly: when we ask our audience for consent and we honor the preferences they have are already expressed (such as activating dark mode), we are building a relationship of trust and mutual interest with those people.
Why Dark Mode?
For those with unique health and wellness needs, dark mode may potentially help with:
- Reduction of eye strain due to light sensitivity
- Reduced risk of migraines and seizures
- Any number of health conditions, life circumstances, or personal wellness needs we may or may not be aware of
Since supporting accessibility inevitably benefits everyone (ever try to enter a building without a ramp while pushing a stroller or pulling a cart?), we can also appreciate some fairly universal benefits of dark mode:
- In low light settings such as a movie theater or bedroom, dark mode draws less attention and helps us avoid disturbing others
- Reduction in light from our electronic devices in the evening can help us sleep better
- Saves battery on your device by wasting less energy on screen light
If you like solving puzzles as much as I do, leveraging accessibility enhancements like dark mode is also a fun challenge for us to solve while benefitting our visitors. So, let's get on with the "how".
How to Implement Dark Mode
In the interest in giving the visitor the most control over their experience, I chose to implement dark mode in two ways:
- By detecting the visitor's color mode preference in their machine's settings
- By allowing the visitor to override their machine preferences by selecting dark or light mode on my site through an accessibility menu
To test this, you'll need to activate dark mode on your own testing machine.
Enabling Dark Mode on a Windows PC
On your PC, go to Settings > Personalization > Colors > App Mode and select "Dark."

Enabling Dark Mode on Mac
To enable dark mode on a Macintosh computer, go to > System Preferences > General and select "Dark."
If you are on Mac OS Ventura, go to > System Settings > Appearance and select "Dark."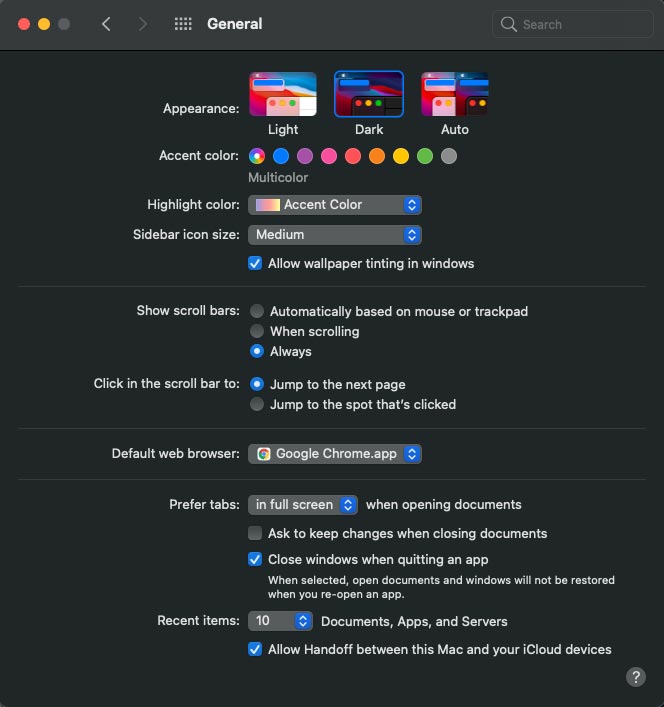
Organizing your CSS
Next, organize all your site styles so that background and text colors exist in two separate CSS files: one called light.css with your default color combinations and one called dark.css with your dark mode colors. Here is how my CSS files are organized as of writing this article:
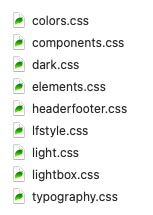
My typography.css file, for example, contains all my basic typography styles except the colors of the typography. Remember to check your combinations for accessible color contrast ratios at webaim.org.
Add the Stylesheets to the Head
Next, reference these two color mode stylesheets you created in the head tag of your site, changing the file path to reflect your own site's file structure:
As you can see, the light.css file (light mode styles) is active by default and has an ID = "color-mode-style" which we can reference with javascript. Under that, both light.css and dark.css are commented out.
Detecting the Color Scheme Preference of the Visitor
Next, we need to detect whether the visitor has dark mode activated on their machine so that we can adjust to match their preference automatically. We do this with a bit of javascript, which I placed in the footer region of my site:
If the visitor has dark mode activated, the link tag in your site's head with the ID of #color-mode-style will replace your light.css with your dark.css so that your dark color styles load on your site. Make sure this is working correctly by enabling and disabling dark mode in your preferences on your machine, as referenced above, and then hard refresh your site (shift + command + R on Chrome for Mac).
Building an Accessibility Menu
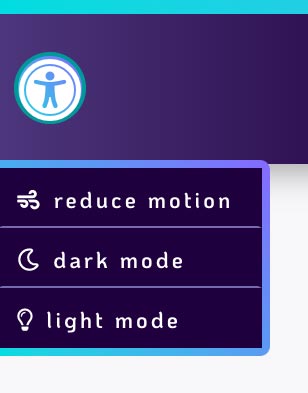
Here is where we go above and beyond to make sure we respond to our visitor's established preferences as well as giving them the power to override those preferences on our site. A visitor might normally prefer dark mode or light mode, but for your site in particular, they want the opposite of what they normally prefer. On this site at the time of writing this article, I created an accessibility menu on the upper left of my site with a fixed position so it will be persistently available.
Accessibility Menu HTML and CSS
Here is the HTML for the menu which I placed in my site's header:
Here is the CSS specifically for the menu I created (not all of my inherited styles are included here, but you get the gist )
The result:
Accessibility Menu Functionality
First, we need your basic menu functions - open and close the menu, activate and deactivate the buttons. I placed this in an external js file which I referenced in the head of my site. Since light mode and dark mode should switch one another off but they should not effect the separate reduce motion setting, I coded this to ignore my "reduce motion" button. Don't forget to include keyboard accessibility in your javascript.
Lastly, we need to add some javascript to allow these buttons to swap out your light.css and dark.css files. This bit doesn't work in an external stylesheet, so I added it to the footer region of my site where that first bit of prefers-color-scheme javascript also resides:
That's it! I hope you found this article helpful and that it helped you to make your site more inclusive and accessible.